
Step by step on how to install the 2nd & 3rd Gen Tacoma Roof Rack!
*Note: Rack now includes gray accent side panels and is now a 2 piece siderail design.
Questions or Support:
Phone: 269-353-1184
Email: info@victory4x4.com


Depending on whether if you have an access cab or double cab Tacoma you will start at different steps.
Access Cab : Step 3
Double Cab : Step 14


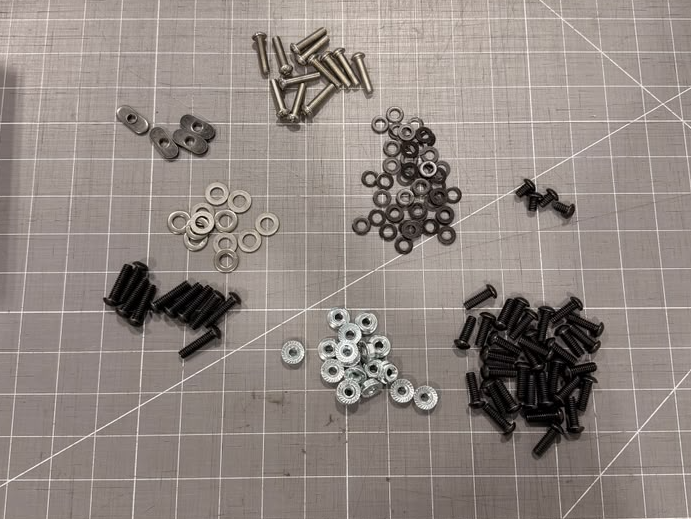
Double check you have all the correct hardware as shown in the 2 images.

- Assemble the rack on the ground. Start by mounting the accent plates to the side rails using the black 1/4”-20 nuts, black 1/4” washers and serrated flange nuts. The mounting holes are the single holes located under the center of some cross bars.


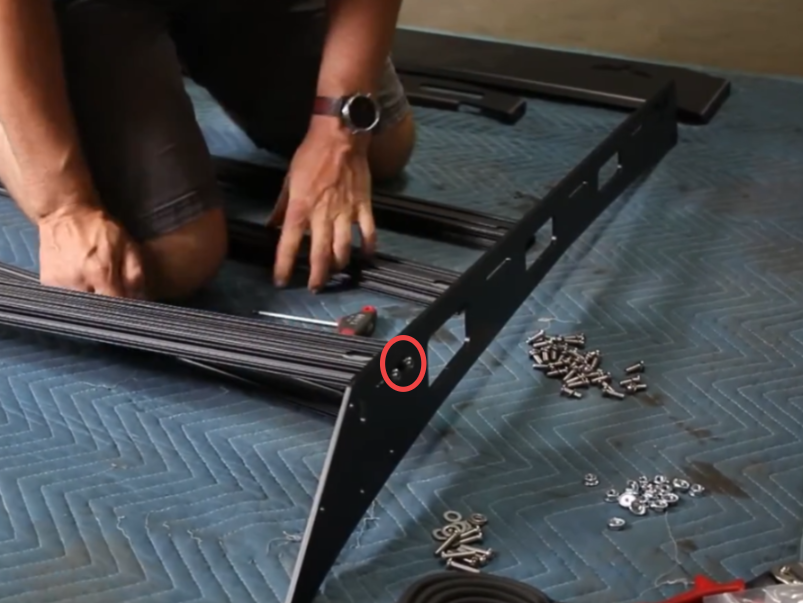
- Assemble the rack on the ground. Start by mounting the crossbars between the two side rails. For this, use the1/4”-20 X 3/4” button head bolts and the 1/4” ID washers (two per bar per side). Make sure the machined slot in the rail of the crossbar is facing up, so that you can easily add t-nuts to mount your gear

- Next, mount the strip of trim to the bottom edge of the front fairing. Start just to the outside of the peak of the bottom edge and continue until it reaches the equivalent point on the other side of the fairing. Cut off any extra. Then, cut the extra in half and mount the two pieces onto the bottom edge of the rear fairing wherever it contacts the roof of the vehicle.

- Next, mount the front and rear fairings. To do this, use the1/4”-20 X 3/4” button head bolts, 1/4” ID washers, and 1/4”-20 serrated flange nuts. The front fairing will need three of each per side and the rear fairing will need two of each per side. When mounting the front fairing, adjust it all the way up to avoid contact with the roof and leave the bolts loose enough to be able to make adjustments once it is on the roof of the vehicle.

- Next, attach the mounts to inside of the rack using the 1/4”-20 X 3/4” button head bolts, 1/4” ID washers, and 1/4”-20 serrated flange nuts. When attaching the front mount, make sure that the angled part of it is angled towards the front of the rack. The rear mounts are identical on both sides so they can be used on either.

- Next you will need to drill 8 holes and install nutserts in each in order to attach the mounts to the roof. To do this, use a small drill bit to drill pilot holes in the correct positions. Then, go back and drill them all out using the 23/64” drill bit provided. Watch the install video to see the correct positions for the holes. Once all the holes are drilled, use the nutsert insert tool to insert the nutserts into each one. Make sure to put some RTV around the nutsert to create a weatherproof seal. When drilling we recommend using a drill stop.
DO NOT GO DEEPER THAN .5”

- Next, apply RTV around the mounting holes on the roof of the vehicle and set the assembled rack into place. Try to get it as close to the correct position as possible so that you don’t accidentally spread the RTV while trying to sliding the rack into position. Then, cover and fill the top of the mounting holes with more RTV so that the bolts will have to pass through it when tightening the mount in to place. Next, tighten it fully into place with the M6 bolts and M8 washers.

- With everything in place, make whatever adjustments necessary in order to get an even gap between the bottom edge of the rack and the roof, all the way down the length of the vehicle and then tighten it into place.

- Finally, push the front and rear fairing down tight to the roof of the vehicle and tighten everything fully into place. We recommend applying clear 3M paint protection film to the roof of the vehicle anywhere the edge trim/fairings make contact with the roof. This will protect the paint from dirt/debris over time.

Congrats, the install is complete, Enjoy!

This is the start of the install guide for the double cab Tacoma.


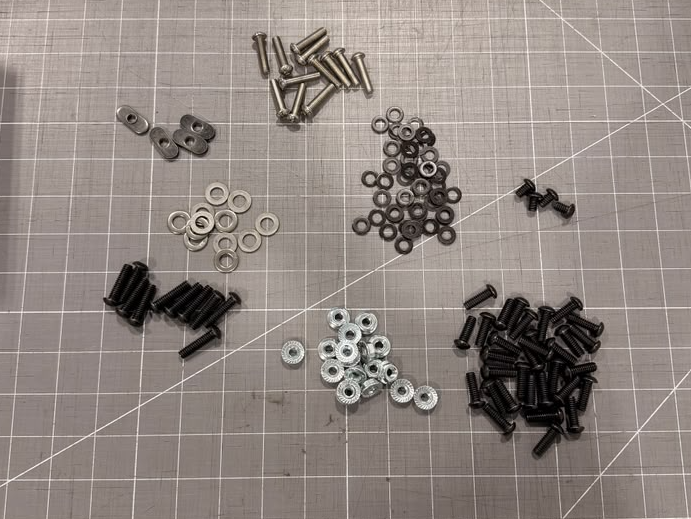
Double check you have all the hardware shown in the 2 images.

Assemble the rack on the ground. Start by mounting the accent plates to the side rails using the black 1/4”-20 nuts, black 1/4” washers and serrated flange nuts. The mounting holes are the single holes located under the center of some cross bars.

- Assemble the rack on the ground. Start by mounting the crossbars between the two side rails. For this, use the1/4”-20 X 3/4” button head bolts and the 1/4” ID washers (two per bar per side). Make sure the machined slot in the rail of the crossbar is facing up, so that you can easily add t-nuts to mount your gear

- Next, mount the strip of trim to the bottom edge of the front fairing. Start just to the outside of the peak of the bottom edge and continue until it reaches the equivalent point on the other side of the fairing. Cut off any extra. Then, cut the extra in half and mount the two pieces onto the bottom edge of the rear fairing wherever it contacts the roof of the vehicle.

- Next, mount the front and rear fairings. To do this, use the1/4”-20 X 3/4” button head bolts, 1/4” ID washers, and 1/4”-20 serrated flange nuts. The front fairing will need three of each per side and the rear fairing will need two of each per side. When mounting the front fairing, adjust it all the way up to avoid contact with the roof and leave the bolts loose enough to be able to make adjustments once it is on the roof of the vehicle.

- Next, attach the mounts to inside of the rack using the 1/4”-20 X 3/4” button head bolts, 1/4” ID washers, and 1/4”-20 serrated flange nuts. When attaching the front mount, make sure that the angled part of it is angled towards the front of the rack. The mid and rear mounts are identical on both sides so they can be used on either.

Next, apply RTV around the mounting holes on the roof of the vehicle and set the assembled rack into place. Try to get it as close to the correct position as possible so that you don’t accidentally spread the RTV while trying to sliding the rack into position. Then, cover and fill the top of the mounting holes with more RTV so that the bolts will have to pass through it when tightening the mount in to place. Next, tighten it fully into place with the M6 bolts and M8 washers.
HELP CENTER
Articles & Guides
GembaDocs Onboarding SOPs
15 Min - SOPs, Guide

New: How to Create, Assign and Track Training Courses
6 Min - Guide

Learn GembaDocs
2 Min - Guides and Video
SOP vs Advanced SOP Guide
10 Min - Guides and Video
Explore
Support Hub
Lean Cave
GembaTalk
More Resources
Bugs & Improvements
Suggest an improvement, or report a bug, direct from the app/platform.
API Documentation
Connect GembaDocs with external systems